2024 Knoxville Marathon Recap

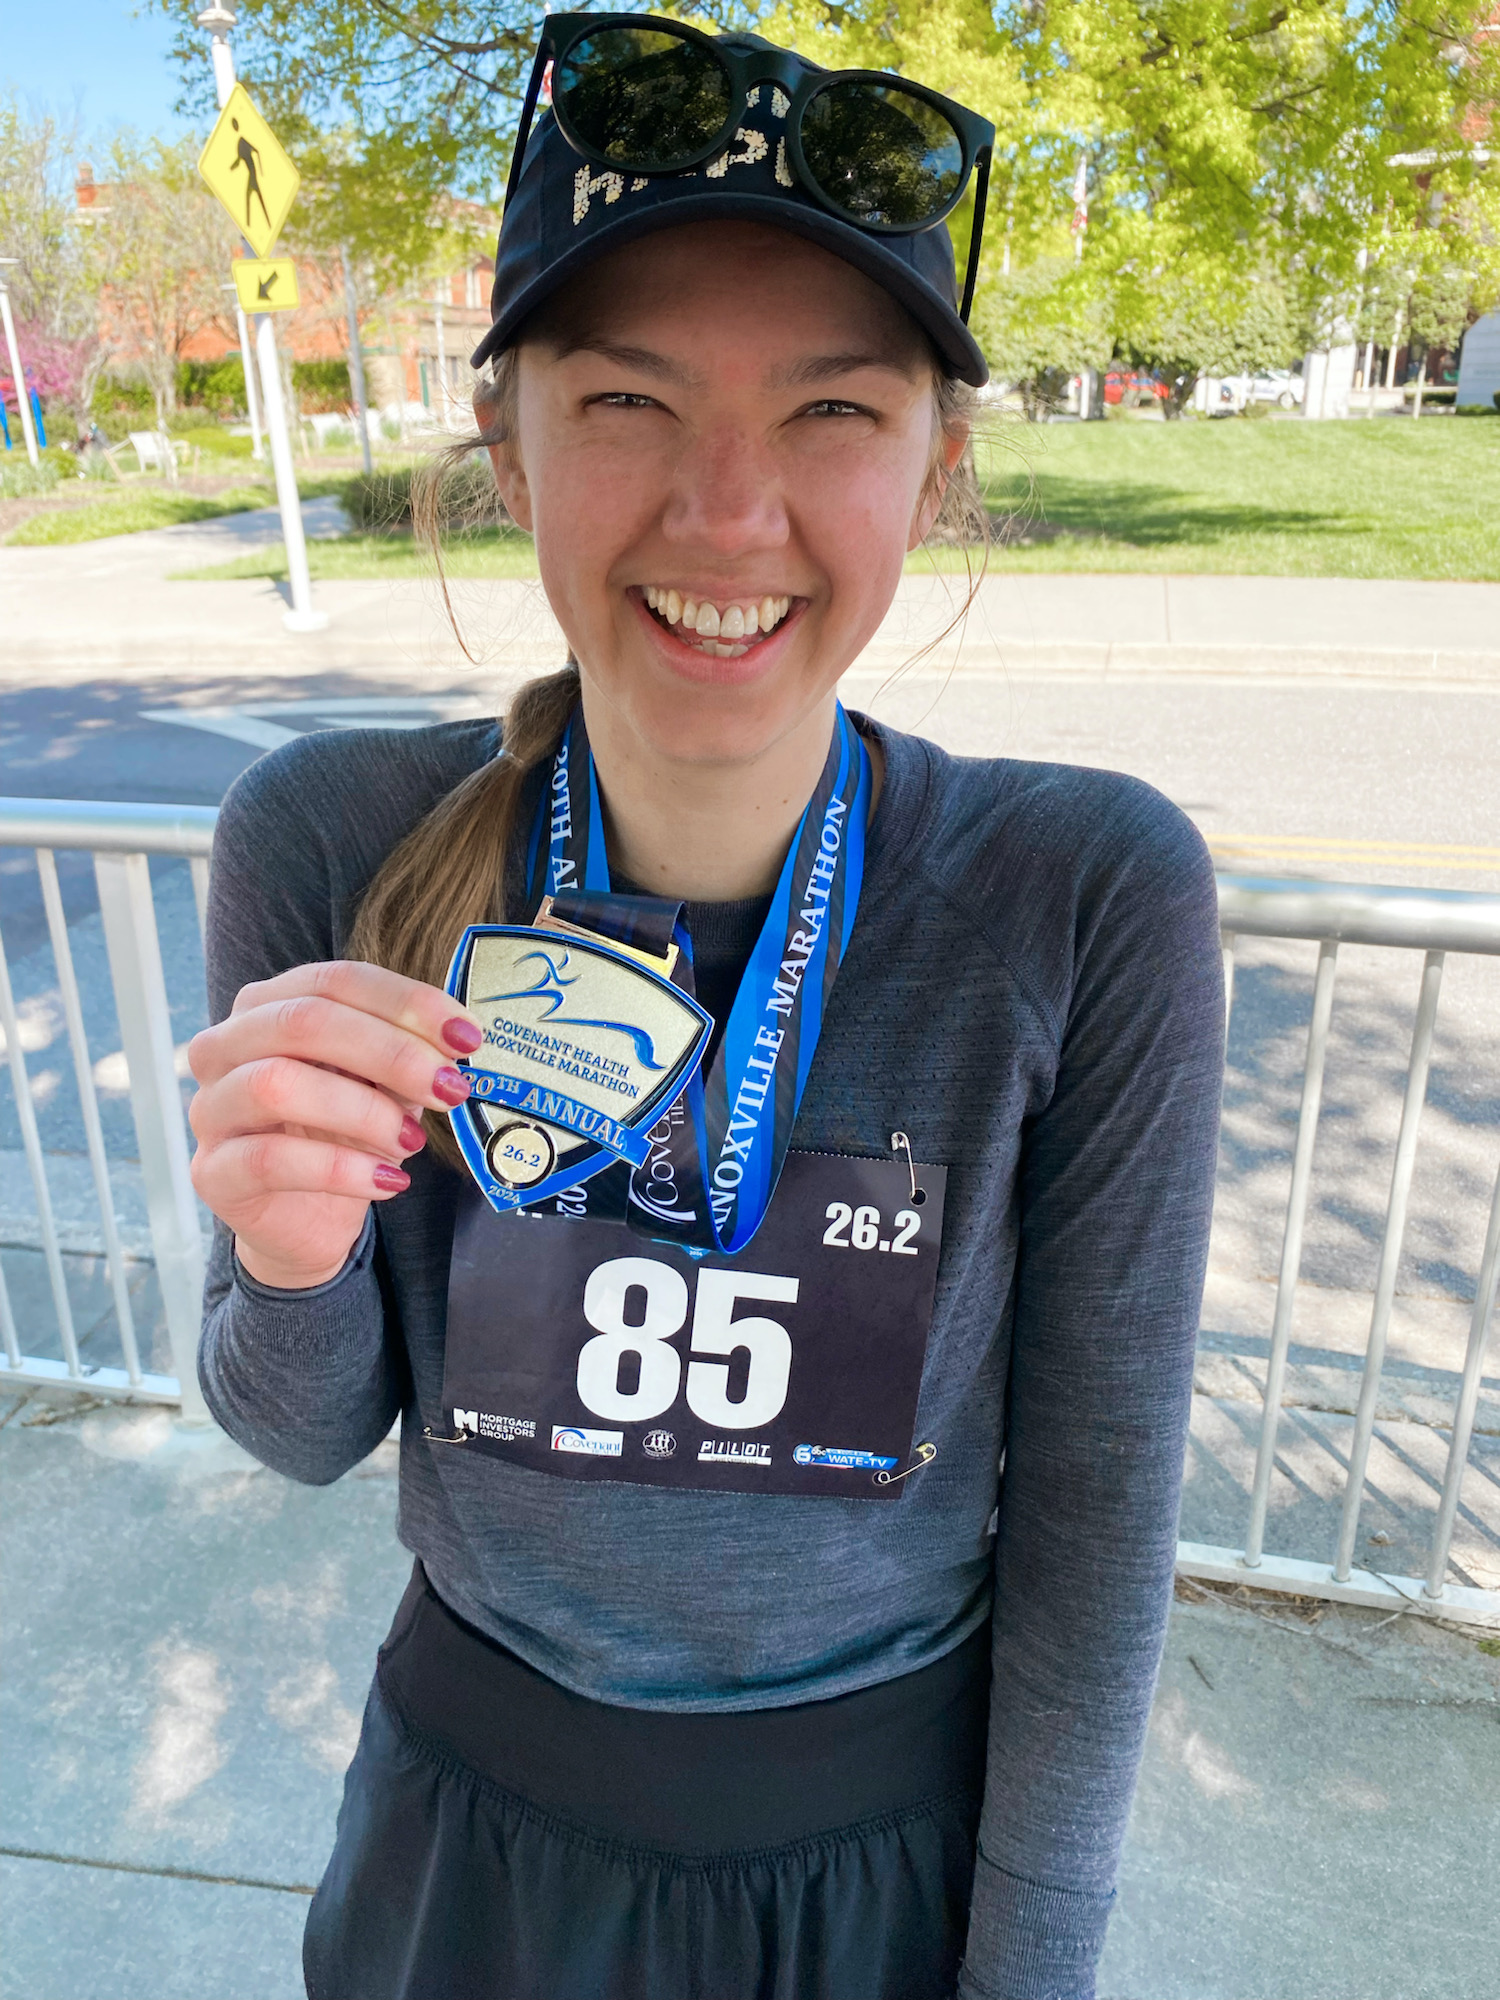
2024 Covenant Health Knoxville Marathon

3 hrs 45 min 44 sec

3rd in my age group, 16th female

Today was notttt my day haha! No PR (although I did get a course PR), no BQ, lotta pain & positive self talk to try to get out of it (I promise I tried @deena8050!!!), but it was a beautiful day, I have the ability to move my body, and I got to share that sweet, sweet finish line with my favorite people. Oh and beer to celebrate (duh). All in all, I can’t complain.

Tired legs, happy heart 🤍

I shared the above sentiment 6 hours after crossing the finish line of the 2024 Knoxville Marathon. This race was not my goal race for 2024 (see my 2024 Houston Marathon Recap for more on that), nor was I originally intending to run the full marathon. The last two years I’ve registered for the Knoxville Half Marathon wayyy in advance to stop myself from running the full. Well, we see how well that tactic has worked (see my 2023 Knoxville Marathon Recap). Oops. 

That being said, since last July I made qualifying for the Boston Marathon (BQing) my running goal. For a female in my age group, that means running below a 3 hour and 30 min marathon. I went hard for that goal in Houston this January. Like, really hard. And I narrowly missed that time. So even though Knoxville wasn’t my goal race, of course I had that time standard in the back of my mind.

So, I jumped straight into another marathon training block after Houston to prepare for Knoxville (would not recommend this tactic). In yesterday’s race, I went out hot. Clearly too hot, because I kind of went up in flames after about 10 miles. Here’s the mile-by-mile play by play if you’re interested: 

  • Getting to the start: I LOVE that I can walk from my apartment to the start line of this race. It’s part of what convinces me to run the full each year. This one’s about as low stress as they come for me. That being said, I probablyyyy should have left 5 min earlier to get to the start yesterday. I was assigned the A corral and the Clinch Ave. bridge was so packed out by the time I got to the start line I couldn’t make my way to the front. I started with the B wave which was fine, it just meant I did a lot of unnecessary weaving through the crowd for the first few miles.
  • Mile 1: My watch beeped at 7:53 pace. Exactly the pace I wanted to hit down to the second. I saw it as a sign that it was my day.
  • Mile 1.5: I dropped 2 of my gels. Maybe not my day.
  • Miles 4-8: Always my favorite section of the course. It’s through Sequoia Hills, arguably the hilliest and most challenging part of the course, but man does that neighborhood show out! I’m talking crowds out cheering, people tailgating the race in their front yards, tons of music, and even a house that cooks bacon right on the road for the runners if they want to risk some potentially questionable stomach-related results from the free snack. I saw several Pure Barre friends in the neighborhood which gave me a great boost! I was still on pace and feeling relatively good. 
  • Mile 8: Noelton Hill. Always a doozy, but I pushed through.
  • Miles 8 – 11ish: On the greenway. It was nice and peaceful, but this is where I started to feel the results of an aggressive pace through the hills. I tried to just keep putting one foot in front of the other (quickly!).
  • Mile 11ish: Getting off the greenway and through UT’s campus and college houses started feeling really tough. I forgot how many sneaky uphills are in this section.
  • Mile 12.5 or so: The half marathoners split off the course towards the finish line. I started to question why I voluntarily decided not to go with them…
  • Mile 13.1: I was a bit disappointed to see I hit the halfway mark at 1 hr 48 min. That’s when I knew there was no way I was negative splitting 6 minutes in the second half to hit my goal time. I had to accept it and decided to just try to enjoy running in the beautiful weather for the second half without going too deep into the pain cave. 
  • Mile 14: I saw Billy, Jake and my dad for the first time since the start. It was a great boost! Swapped my headband for my hat.
  • Miles 14 – 18: Some of the more challenging miles of the race. The runners and the crowds on the sidelines reallyyyy thin out and I was wishing I had my headphones for a little extra music motivation. This part of the course is mostly in the direct sun, and I was starting to regret my long sleeve shirt.
  • Mile 17ish: A lone sideline supporter in a camp chair and his dog were howling back and forth on the side of the road. It truly gave me the giggles and a welcomed boost in a remote area of the race.
  • Mile 19: I saw my fam again and passed off my gloves. I remember telling them “I hurt so bad”, which, of course, was a bad decision because vocalizing that feeling made the pain more real. I felt a catch in my throat and really had to work to take some deep breaths and shift my focus, so I could keep breathing and keep running.
  • Mile 20-21: This stretch crosses the James White Parkway bridge. Perhaps the most challenging mile of the course, in my opinion. I was dreading this section from last year, but luckily I fell in line with another runner on the course. We didn’t speak, but we ran the length of the bridge side by side and his matching stride really helped get me across. Thank you, kind stranger! I hope the rest of his race went well.
  • Miles 21 – 24.5: A sluggish blur through Island Homes. The pain was different than Houston. There, I was digging deep, but it was my decision and I still felt strong. Knox just felt like I couldn’t will my legs to go any faster, which was super frustrating. 
  • Mile 24.5: FINALLY made it to the Gay St. bridge and I was so happy to be feeling the pain going up the hill to get there. I knew when I crossed the bridge and made it back into downtown that I would be entering the last mile of the race.
  • Mile 25: Gay St. has never felt so long. It’s amazing how the slightest uphill at this point felt nearly impossible. I kept telling myself “the only way out is through.”
  • Finish: After what felt like maybe the hardest marathon of my life, I finally made it to the finish and to my family. Certainly the best part of the day.

I’m honestly not upset about how the race went yesterday. In Houston I was crushed, in Knoxville I tried to keep a positive mindset despite how I was feeling. I know the course isn’t BQ or PR friendly (helloooo elevation profile) and I knew it wasn’t my goal race for the year. I was honestly just so thrilled to see my family along the course and SO happy when I FINALLY crossed that finish line and I got to spend the rest of the day celebrating with my family over pizza and beer.

Next time you’re preparing for a race I highly recommend Deena Kastor’s book, Let Your Mind Run. I re-read it before every marathon and I truly believe her reminders of the power of positive thinking got me across the finish line yesterday. Remember, we’re allowed to have big goals and dreams and be sad if we fall short. It will make achieving them all the sweeter when it happens.

Here’s to many more miles, though I’m excited to focus on some shorter distances in the near future 🙂 

xoxo – Haven

Stacked Veggie Wrap

I probably should have learned from the professionals (@ Chipotle) about how to properly roll a wrap before attempting this. The veggie mixture is just so dang flavorful I mayyy have overstuffed the tortilla a bit. Anyways – this wrap is a great way to use up the random veggies in your fridge and it’s an ultra flavor-packed lunch! I hope you love it as much as I do!

Ingredients

  • 1 tortilla 
  • 2 tbsp garlic hummus
  • 2 tbsp dijon mustard
  • 1/2 avocado, mashed
  • Large handful of spinach 
  • Pickled onions
  • Banana peppers
  • Diced cucumber 
  • Cherry tomatoes, halved 

Directions

  1. Spread garlic hummus on the tortilla.
  2. Mash the avocado and spread on top of the hummus.
  3. Chop all the veggies, including the spinach, and place in a mixing bowl. Drizzle with dijon mustard and toss well.
  4. Add the veggie mixture onto your tortilla and rollll it up, babbyyy.
  5. Enjoy!

Let me know if you make this delish wrap for your work lunches by commenting below or send me a photo of your creation on instagram @healthbyhaven. Did you change it up? I wanna know!! I love seeing your HxH creations!

Orzo Veggie Pasta

A creamy, delicious, decadent pasta that sneaks in a ton of veggies! What more could you ask for? I love making this when I’m feeling ~ fancy ~ but I still want a filling meal with protein and veggies.

Ingredients

  • 1 c orzo chickpea pasta 
  • 2 c veggie broth 
  • 1 bundle of asparagus, chopped 
  • 2 large zucchini, grated 
  • Garlic-infused extra virgin olive oil (or regular extra virgin olive oil if you don’t have time to pre-make the garlic infused kind)
  • 1 c cherry tomatoes 
  • Salt, black pepper and minced garlic, to taste
  • Optional: vegan parmesan, goat cheese or your favorite cheese
  • Optional: caramelized onion 
  • Toppings: coarse sea salt  and arugula sprouts 

Directions

  1. Preheat your oven to 425 degrees fahrenheit. 
  2. In a deep frying pan, cook the orzo in vegetable broth instead of water for added flavor.
  3. While the orzo is cooking, wash and chop the asparagus. Toss in garlic-infused extra virgin olive oil, salt and pepper and spread on a baking sheet lined with parchment paper. Roast for 15-20 min or until crispy.
  4. Next, grate two large zucchinis. I like using my food processor to speed things up, but if you don’t have one you can use a box grater. 
  5. Once the orzo has absorbed most of the vegetable broth, creating a fluffy, noodle consistency, add the grated garlic to the saucepan and mix well.
  6. Season with salt, pepper and minced garlic to taste, stir well.
  7. Just before removing from the stovetop, toss in the roasted asparagus and cherry tomatoes and give the mixture one more stir.
  8. Remove from heat and place in serving bowls. 
  9. Optional – add in your favorite cheese. Billy loves goat cheese in this meal and I love it with vegan parmesan.
  10. Optional – add in caramelized onion. Full disclosure, I would put this in any dish (kind of like garlic), so if you’re an onion enthusiast like me definitely add it in.
  11. Top with arugula sprouts and coarse sea salt. Enjoy!  

Pro tip! Elevate this meal (and, let’s be honest, any meal) with garlic-infused extra virgin olive oil. It’s superrrr easy to make AND you’ll have fresh roasted garlic on hand for recipes too! A win-win if I’ve ever heard one. Just be sure to prep this ahead of time – it takes a few hours. I like to always have roasted garlic and garlic-infused extra virgin olive oil on hand to add a punch of flavor to my meals. 

Here’s how to make Roasted Garlic and Garlic-Infused Extra Virgin Olive Oil! You can thank me later.

HxH Staples: Roasted Garlic AND Garlic-Infused Extra Virgin Olive Oil

Garlic is my love language. If you also can’t get enough of it, here are two simple options to add more garlic into your life. Having these on hand is a non-negotiable in the Quinlan household. They’re SUPER easy to make and will make any meal feel gourmet! 

Ingredients

  • 2-3 heads of garlic
  • Roughly 2 c extra virgin olive oil

Directions

  1. Preheat your oven to 225 degrees fahrenheit.
  2. While the oven is preheating, remove the peels from your heads of garlic. 
  3. Place the cloves of garlic in a loaf pan or small brownie pan. I try to use the smallest pan I have to use up less oil.
  4. Cover the garlic completely with oil. This is crucial for the quality of the roasted garlic.
  5. Cook in the oven for 2 hours. Your house will smell amazing – you’re welcome. 
  6. After 2 hours, remove from heat and let cool completely.
  7. Remove the roasted garlic (yum!) and place in an airtight glass container. Store in the fridge.
  8. Then, strain the oil to catch any garlic peel debris that may remain.
  9. Store the oil in a glass oil decanter at room temperature and use while cooking to your heart’s desire!
  10. Yay for no waste and yay for more garlicky recipes! 

Pro tip: If you don’t have time to peel the garlic before cooking, simply chop the bottom of the head of garlic off to allow the oil to infuse. Once it’s done roasting and cooling, the garlic cloves will squeeze out of the peel fairly effortlessly. Only two down-sides to this method. One – it’s messy! Two – you must use substantially more oil to cover the head of garlic completely while cooking. Make the decision that’s right for you! Either works!

Blueberry & Pickled Onion Greens & Grains Salad

I love making this showstopper salad for a potluck, family dinner or as meal prepped lunches! Be sure to prep your quinoa and pickled onion ahead of time if you’re trying to toss in a bowl for a quick lunch. The flavor combo is so good, and the greens and grains together help keep you satisfied until your next meal.

Ingredients (makes 1 serving)

  • 1 c spinach
  • 1/2 c cooked tri-colored quinoa 
  • 1/4 c pickled onion
  • 1/4 c blueberries
  • 1/2 avocado, diced
  • Your favorite balsamic vinaigrette or balsamic vinegar and olive oil

Directions

  1. Cook quinoa according to package directions.
  2. While the quinoa is cooking, prep the remainder of your salad. Combine spinach, pickled onion, blueberries and avocado and toss well in dressing.
  3. Add in the quinoa and toss again. Enjoy! 

Pro tip – pickled onions are super easy to make – you just have to prep them in advance and store them in an airtight jar in the fridge. Check out my recipe here!

Follow @healthbyhaven on Instagram for more recipes like this! 

HxH Staples: Pickled Onions

Pickled onions are super easy to make, good for your gut, and delicious to throw into tons of recipes! I try to always have a jar on hand in my fridge to elevate even the quickest of tossed-together meals. Be sure to prep them in advance of needing them, as they’ll need time to chill in the fridge.

Ingredients

  • 1/2 red onion
  • 1 c white wine vinegar 
  • 2 tsp salt 

Directions

  1. Thinly slice the red onion. Peel the layers apart and stuff into a glass jar with an airtight lid (I use a mason jar). Set aside. 
  2. Next, simmer the white wine vinegar and salt on the stovetop. Whisk constantly until the salt fully dissolves. 
  3. When the salt is dissolved, remove the mixture from heat and pour over the onion in the jar. This should immediately start to break down the onion. Push the onion down with a fork to immerse it in the hot vinegar mixture. 
  4. Leave on the countertop to cool for about 20 min, or until the jar is fairly cool to touch.
  5. Screw on the airtight lid and refrigerate overnight.
  6. Ta da! You have easy, delish pickled onions ready to spice up your next meal.

What other fridge or pantry staples do you like having on hand to elevate your meals? Let me know in the comments below or on Instagram @healthbyhaven

Stacked Veggie Sandwich

I’ve been making this Stacked Veggie Sandwich for my lunches all week and woowwwww is it a flavor explosion! Who said eating veggies is bland and boring? The mustard and hummus pack a punch and are balanced out nicely with the creaminess of the avocado, tanginess of the pickled onion and freshness of the cucumber and carrot. 

Ingredients

  • 2 slices of whole wheat bread (I like Dave’s Killer Bread)
  • 2 tbs garlic hummus
  • 2 tbsp dijon mustard
  • 1/2 avocado, mashed
  • Large handful of spinach 
  • Pickled onions, to taste
  • 1/4 shaved cucumber 
  • 1 shaved carrot

Directions

  1. Spread garlic hummus on one slice of bread and dijon mustard on the other.
  2. Mash the avocado on one slice of bread.
  3. Layer spinach on the slice with avocado (you’ll only stack your sandwich on one side. Yeah – don’t make that rookie mistake).
  4. Next, add pickled onion.
  5. Use a vegetable peeler to shave some cucumber and carrot and add to your sandwich. 
  6. Top with your second slice of bread and enjoy!

Let me know if you make this delish sandwich for your work lunches by commenting below or send me a photo of your creation on instagram @healthbyhaven. Did you change it up? I wanna know!! I love seeing your HxH creations!

Protein Penne alla Vodka

Why choose between a delicious pasta and a high-protein meal? I say you can have both!!! This Protein Penne alla Vodka tastes super indulgent but packs in the protein with tofu and chickpea pasta.

Ingredients

For the sauce

  • 1 block of silken tofu
  • 1/2 c veggie broth
  • 12 oz tomato sauce
  • 2 tbs nutritional yeast 
  • 3 cloves garlic, roasted
  • 1/2 onion, caramelized 
  • Salt, black pepper, and dried oregano, to taste

Other ingredients

  • 1 box of chickpea penne pasta (I like Banza)
  • 1 c cherry tomatoes
  • Fresh basil, to top
  • Regular or vegan parmesan, to top

Directions

  1. Blend the tofu, veggie broth, tomato sauce, nutritional yeast, salt, black pepper, dried oregano, garlic and onion in a high power blender until a smooth sauce forms.
  2. Next, transfer the sauce into a saucepan and heat the sauce on the stovetop on low heat. 
  3. While the sauce is simmering, cook the pasta according to package directions.
  4. When the pasta is cooked, drain and add to the sauce.
  5. Mix well, then add the cherry tomatoes. Mix again.
  6. Serve and top each bowl with parmesan and fresh basil.
  7. Enjoy!

This one is sure to be a hit at your next dinner party or family gathering! Let me know what you think in the comments below or on Instagram @healthbyhaven.

Chocolate Raspberry Protein Blended Chia Pudding

A chocolate protein valentines breakfast? Say less!

Ingredients (makes 4-6 servings)

  • 1 can full fat coconut milk
  • 1 c nut milk (I like using my Homemade Cashew Milk to make it extra creamy!)
  • 1.5 c frozen raspberries
  • 1/4 c chocolate protein powder
  • 1/4 c cacao powder
  • 8 tbsp chia seeds
  • 2 tsp agave (optional)

Directions

  1. Blend it all up. Pour into a 9×9 glass dish. Cover and refrigerate overnight.
  2. When you’re ready to eat, top with more raspberries & cacao nibs.
  3. Enjoy with your loves!

Let me know what ya think of this decadent, protein-packed breakfast in the comments below or find me on Instagram @healthbyhaven.

Java Chip Overnight Oats

If ya love oatmeal but you’re rushing out the door every morning, you have to try meal prepping overnight oats! I have lots of flavor options (see: PB Banana Bread, Matcha, Pumpkin Spice, Peanut Butter, & Cacao Coconut), and if you’re a coffee connoisseur this Java Chip Overnight Oats recipe is perfect to add into your rotation.

Ingredients (serves 1)

Dry Ingredients

  • 1/2 c steel cut oats
  • 1 tbsp chia seeds
  • 1 tbsp milled flax seeds
  • 1 tbsp raw cacao powder

Wet Ingredients 

  • 1/2 c cold brew
  • 1/2 c almond milk (or use your fave type of milk)
  • 1 tsp agave nectar 

Optional Toppings

  • Raw cacao nibs
  • Your favorite fruit 

Directions

  1. Mix together the dry ingredients so they’re well incorporated. 
  2. Add in the wet ingredients and stir until combined. 
  3. Pop in the fridge overnight to allow the creamy oatmeal texture to form.
  4. In the morning, grab your oats and top with your favorite toppings. I love the raw cacao nibs to truly make this a java chip recipe, and blueberries are also great here!

Let me know your favorite overnight oats flavor in the comments below or on Instagram @healthbyhaven!